

One of the most important parts of your DevOps and CICD journey is a Declarative Pipeline Syntax of Jenkins
⛏What is Pipeline?
A pipeline in Jenkins is like a series of steps that define how your software is built, tested, and deployed. It's a way to automate these processes so that whenever you make changes to your code, Jenkins can automatically build, test, and deploy your software without you having to do it manually. This helps in ensure that your software is up-to-date and works according to latest changes.
Jenkins supports two types of pipelines:
Declarative: A Declarative Pipeline in Jenkins is a more structured and simplified way to define a Jenkins pipeline compared to the Scripted Pipeline. It has a predefined structure and provide a guided way to write pipelines.
you define the pipeline using a specific syntax in a Jenkinsfile. This syntax includes predefined stages such as pipeline, agent, stages, and steps, which help organize and define the different parts of your pipeline.
The Advantages of using a Declarative Pipeline are:
Simplified Syntax: The syntax is easy to understand, especially for beginners or those unfamiliar with Groovy scripting.
Built-in Stage View: Declarative Pipelines automatically generate a visual representation of your pipeline stages, making it easier to visualize the flow of your pipeline,which we will see further .
Easier Error Handling: Declarative Pipelines provide better support for error handling and recovery, with built-in mechanisms for retrying failed steps or stages.
Rich Plugin Ecosystem: Declarative Pipelines can make use of the vast library of Jenkins plugins, allowing you to easily integrate with other tools and services.
Overall, Declarative Pipelines provide a more structured and guided approach to defining Jenkins pipelines, making them easier to write, read, and maintain.
Scripted: Scripted was the first and most traditional implementation of the pipeline as a code in Jenkins. It was designed as a general-purpose DSL (Domain Specific Language) built with Groovy.
In a Scripted Pipeline, you write Groovy code directly in the Jenkinsfile to define the build, steps, and any loops needed for your pipeline. This gives you more control over the flow of your pipeline and allows you to customize it to your requirements.
The features of Scripted Pipelines are:
Flexibility: Scripted Pipelines allow you to define your pipeline using Groovy code, which give you the flexibility to create complex build processes with custom logic and conditions.
Advanced Concepts: With Scripted Pipelines, you can use advanced Groovy features such as functions, classes, and libraries, which allow more power to you to customize according to need.
Scripted Pipelines are a powerful tool for defining Jenkins pipelines when you need more control and flexibility than what is provided by Declarative Pipelines.
⛏Why you should have a Pipeline?
The definition of a Jenkins Pipeline is written into a text file (called a Jenkinsfile) which in turn can be committed to a project’s source code repository.
This is the foundation of "Pipeline-as-code" treating the CD pipeline as a part of the application to be versioned and reviewed like any other code.
Having a CI/CD pipeline in your software development process, offers several key benefits:
Automation: A pipeline automates the process of building, testing, and deploying your software, reducing the manual effort required and minimizing human error.
Time saving: By automating and streamlining the development and deployment process, a pipeline helps you deliver new features and updates to your software more quickly.
Visual map: A pipeline provides visibility into the status of each stage of your development process, making it easier to identify and troubleshoot any issues that arise.
Reliability: A pipeline helps ensure that your software is always in a deployable state, as each change goes through a series of automated tests before being deployed.
Having a pipeline in your software development process can improve the efficiency, reliability, and quality of your software delivery process, helping you deliver better software to your users more quickly and consistently.
👩🔧Pipeline syntax
pipeline {
    agent any
    stages {
        stage('Build') {
            steps {
                //
            }
        }
        stage('Test') {
            steps {
                //
            }
        }
        stage('Deploy') {
            steps {
                //
            }
        }
    }
}
Task-01:Complete Declarative pipeline
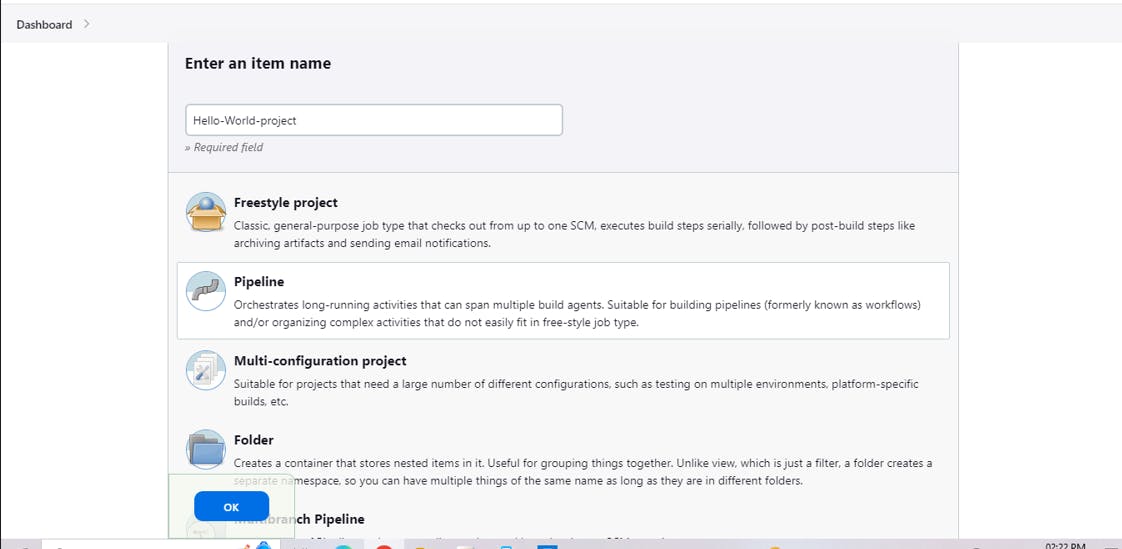
To create a new job in Jenkins using a Declarative Pipeline.Here's a step-by-step guide:
Create a New Job:
Go to your Jenkins dashboard and click on create a new job.
Enter a name for your job (e.g., "Hello-World-project") and select "Pipeline" as the job type.
Click "OK" to create the job.
Define the Pipeline:
In the job configuration page, scroll down to the "Pipeline" section.
Select "Pipeline script" from the "Definition" dropdown.
Copy and paste the following Declarative Pipeline script into the "Script" text area:
    pipeline {
        agent any
        stages {
            stage('Greetings') {
                steps {
                    echo 'Hello, World!'
                }
            }
        }
    }
This script defines a simple pipeline with one build stage (
Greetings) that echoes "Hello, World!".
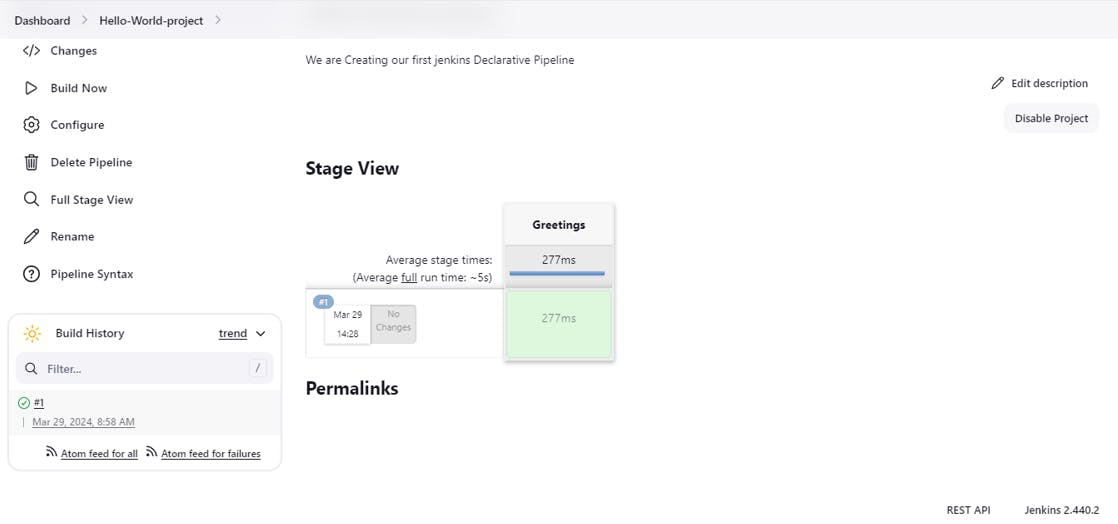
Run the Pipeline:
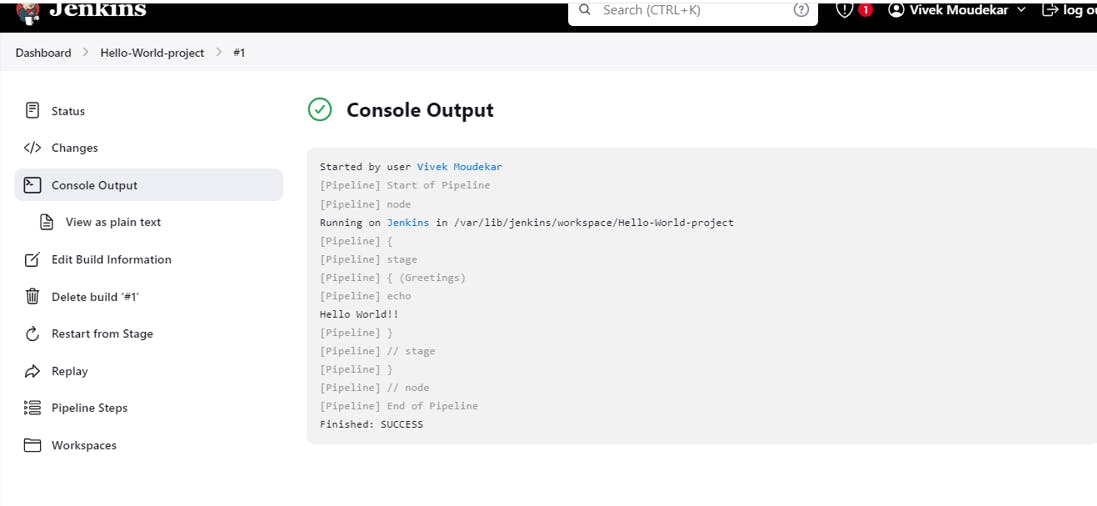
Click on "Build Now" to run the pipeline.
Jenkins will start a build of your pipeline and we can see the output "Hello, World!" in the build console output.
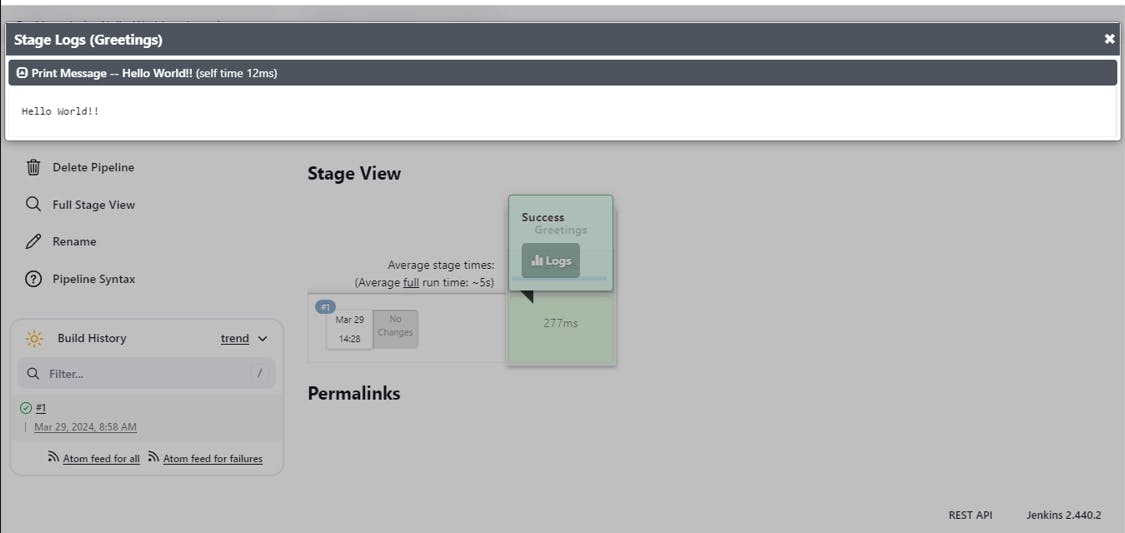
🎊Conclusion:
That's it! You've created a new job in Jenkins using a Declarative Pipeline and run the official Jenkins "Hello World" example.